【UnityC#講座】ユニティちゃんをモブキャラのごとくランダム移動させる【NavMeshAgent】

モブキャラランダム/トップ

Unity2019.2.2f1
Windows10

モブキャラランダム/トップ

今回はNavMeshAgentを使ってランダムにうろうろ移動するモブキャラ的なものを作ってみました。

■オブジェクトを設置する

モブキャラにはユニティちゃんを使います。

unity-chan! > unity-chan!Model > Models > unitychan

そしてPlaneと空のオブジェクトを出してください。

Hierarchy > Create > 3D Object > Plane

Hierarchy > Create > Create Empty

空のオブジェクトはランダムで移動する際の中心の位置をとるために出します。
名前はCentralPointにしました。
位置はどれも中央にしておくのが無難でしょう。

モブキャラランダム/ユニティちゃんとPlane

■NavMeshAgentの設定

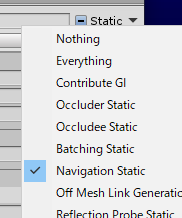
PlaneにNavMeshAgentの設定をします。
PlaneのInspectorの右上のStaticの部分の▼マークをクリックし、Navigation Staticをクリックしてください。

モブキャラランダム/NavigationStatic

メインメニューのWindowからNavigationウィンドウを出します。

Window > AI > Navigation

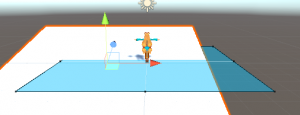
NavigationウィンドウのBakeタブのBakeボタンを押すと、Navigation Staticを選んだオブジェクトにNavMeshAgentが移動できる青い範囲が設定されます。

モブキャラランダム/NavMeshAgent/Bake

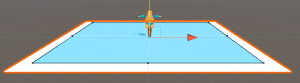
ちなみにPlaneを動かしてもその範囲は一緒に動かないのでBakeし直す必要があります。

モブキャラランダム/NavMeshAgent/Bake/Plane斜め

あとは動かしたいオブジェクトにNavMeshAgentコンポーネントを設置するのですが、今回はスクリプトで追加します。

■AnimatorControllerの設定

ユニティちゃんのAnimatorControllerを設定します。
使うのはWAIT00とWALK00_Fの2種類です。

Project > Create > AnimatorController

Animatorウィンドウの罫線の画面上で右クリックしてBlend Treeを出します。

Create State > From New Blend Tree

モブキャラランダム/AnimatorController/BlendTree

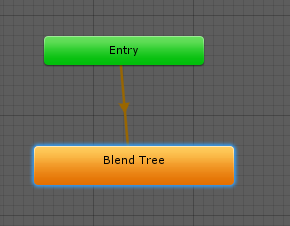
Blend Treeとあるオレンジの長方形のもの(State)をクリックすると画面が変わります。
前の画面に戻るなら上のBase Layerと書かれた部分をクリックしてください。
灰色のBlend Treeと書かれた部分をクリックし、Inspectorを設定します。

モブキャラランダム/AnimatorController/BlendTree2

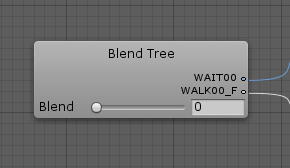
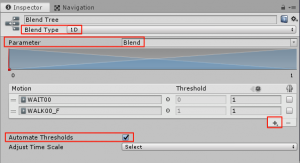
Blend Typeは1D、ParameterはBlendに最初からなってると思います。
Motionの右下の+ボタンを2回クリックし、アニメーションクリップを設定します。
Projectビューからドラッグ&ドロップしても良し、入力欄の右にある丸をクリックして選択しても良しです。
ThresholdはWAIT00が0でWALK00_Fが1です。
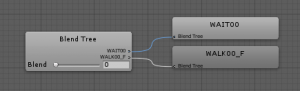
Automate Thresholdsのチェックを外すと編集できます。

モブキャラランダム/AnimatorController/BlendTree/Inspector

そうするとこういう画面になります。

モブキャラランダム/AnimatorController/BlendTree/結果

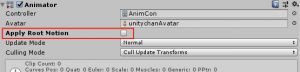
最後はHierarchyに出しているユニティちゃんのInspectorにセットします。
AnimatorコンポーネントのControllerの欄にドラッグ&ドロップするか、右端の丸をクリックして選択してください。
あとApplyRootMotionはチェックを入れているとアニメーションで位置を変えますが、今回は外してください。

モブキャラランダム/AnimatorController/ApplyRootMotion

スポンサーリンク

■スクリプトを書く

あとはスクリプトを書いてセットするだけです。

using System.Collections;
using System.Collections.Generic;
using UnityEngine;
//NavMeshAgent使うときに必要
using UnityEngine.AI;
//オブジェクトにNavMeshAgentコンポーネントを設置
[RequireComponent(typeof(NavMeshAgent))]
public class RandomMove : MonoBehaviour
{
//位置の基準になるオブジェクトのTransformを収める
public Transform central;
private NavMeshAgent agent;
//ランダムで決める数値の最大値
[SerializeField] float radius = 3;
//設定した待機時間
[SerializeField] float waitTime = 2;
//待機時間を数える
[SerializeField] float time = 0;
Animator anim;
//Vector3 pos;
void Start()
{
agent = GetComponent<NavMeshAgent>();
anim = GetComponent<Animator>();
//目標地点に近づいても速度を落とさなくなる
agent.autoBraking = false;
//目標地点を決める
GotoNextPoint();
}
void GotoNextPoint()
{
//NavMeshAgentのストップを解除
agent.isStopped = false;
//目標地点のX軸、Z軸をランダムで決める
float posX = Random.Range(-1 * radius, radius);
float posZ = Random.Range(-1 * radius, radius);
//CentralPointの位置にPosXとPosZを足す
Vector3 pos = central.position;
pos.x += posX;
pos.z += posZ;
//NavMeshAgentに目標地点を設定する
agent.destination = pos;
}
void StopHere()
{
//NavMeshAgentを止める
agent.isStopped = true;
//待ち時間を数える
time += Time.deltaTime;
//待ち時間が設定された数値を超えると発動
if(time > waitTime)
{
//目標地点を設定し直す
GotoNextPoint();
time = 0;
}
}
void Update()
{
//経路探索の準備ができておらず
//目標地点までの距離が0.5m未満ならNavMeshAgentを止める
if (!agent.pathPending && agent.remainingDistance < 0.5f)
StopHere();
//NavMeshAgentのスピードの2乗でアニメーションを切り替える
anim.SetFloat("Blend", agent.velocity.sqrMagnitude);
}
}
view raw 40.cs hosted with ❤ by GitHub

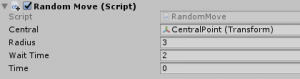
CentralPointの位置を中心にランダムで決められた範囲の中に目標地点を作り移動します。
waitTimeを変えることで待ち時間を変えられます。

ユニティちゃんにアタッチしたらInspectorにCentralPointを入れて出来上がりです。
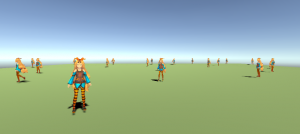
モブキャラランダム/スクリプト設定

このようになりました。

■修正したスクリプト

先ほどのスクリプトだと移動しながら向きを変えているのが不自然です。
なので向きを変えてから移動するようにスクリプトを修正しました。

using System.Collections;
using System.Collections.Generic;
using UnityEngine;
//NavMeshAgent使うときに必要
using UnityEngine.AI;
//オブジェクトにNavMeshAgentコンポーネントを設置
[RequireComponent(typeof(NavMeshAgent))]
public class WaitRotation : MonoBehaviour
{
public Transform central;
private NavMeshAgent agent;
[SerializeField] float radius = 3;
[SerializeField] float waitTime = 5;
[SerializeField] float time = 0;
Animator anim;
Vector3 pos;
void Start()
{
agent = GetComponent<NavMeshAgent>();
anim = GetComponent<Animator>();
agent.autoBraking = false;
//NavMeshAgentで回転をしないようにする
agent.updateRotation = false;
GotoNextPoint();
}
void GotoNextPoint()
{
agent.isStopped = false;
float posX = Random.Range(-1 * radius, radius);
float posZ = Random.Range(-1 * radius, radius);
pos = central.position;
pos.x += posX;
pos.z += posZ;
//Y軸だけ変更しない目標地点
Vector3 direction = new Vector3(pos.x, transform.position.y, pos.z);
//Y軸だけ変更しない目標地点から現在地を引いて向きを割り出す
Quaternion rotation =
Quaternion.LookRotation(direction - transform.position, Vector3.up);
//このオブジェクトの向きを替える
transform.rotation = rotation;
agent.destination = pos;
}
void StopHere()
{
agent.isStopped = true;
time += Time.deltaTime;
if (time > waitTime)
{
GotoNextPoint();
time = 0;
}
}
void Update()
{
if (!agent.pathPending && agent.remainingDistance < 0.5f)
StopHere();
anim.SetFloat("Blend", agent.velocity.sqrMagnitude);
}
}
view raw 40a.cs hosted with ❤ by GitHub

またInspectorからCentralPointをセットしてください。
そしてこうなります。

さらにマップを広く、ユニティちゃんをたくさん出してみましょう。

うーん、壮観ですね。

今回はこれで完成です。
しかし最近の3DゲームのRPGでこんなランダムにうろうろするキャラクターはいるのでしょうか?
2Dだと多かったのですが最近は決まった地点に目的があって動いているように見せるのがトレンドかもしれません。

■関連記事

【UnityC#講座】ユニティちゃんにキソラちゃんがついてくるようにする【NavMeshAgent、Blend Tree】

【UnityC#講座】ユニティちゃんたちをドラクエっぽく一列に移動や順番変更させる【List、for文、NavMeshAgent】

【UnityC#講座】近づいたら追いかけてくる巡回ユニティちゃん【NavMeshAgent】

【UnityC#講座】見つけたら追いかけてくる監視ユニティちゃん【NavMeshAgent】

【UnityC#講座】重複なく配置したCubeをひとつずつ消して行くCubeのゲーム(?)【NavMeshAgent】

【UnityC#講座】列挙型(enum)で行動を分ける【NavMeshAgent】

ユニティちゃんライセンス

この作品はユニティちゃんライセンス条項の元に提供されています

スポンサーリンク

目次に戻る